Managing time off for your team
Add time off for your team members and review time off with ease
With Jibble’s employee vacation tracker, you can easily manage time off for your employees by adding time off and taking actions on time off requests directly in Jibble. This article includes information that’s relevant to Owners, Admins and Managers.
Before you get started with adding or reviewing time off, be sure you have created time off policies for your team.
This guide includes:
- Time off permissions
- Adding time off
- Reviewing time off
- Editing time off requests
- Approving time off requests
- Rejecting time off requests
- Cancelling approved time off requests
- Bulk operations for time off requests
Time off permissions
| Role | Permissions |
| Owner/Admin | Owners/Admins can:
|
| Manager | Managers can:
|
| Member | Members can:
|
Adding time off
When adding time off, you will be able to see the total number of leave days a member has remaining based on the entitled amount set for the time off policy.
- Go to Time Off.
- Click on Add Time Off.
- Fill in the required information for your member’s time off in the sidebar:
- Select the member you want to add a time off for.
- Select a time off policy for the employee’s leave type.
- Select the days or number of hours of time off.
Note: Unit type is dependent on the time off policy created. - If the employee is taking a full day off (or days off), select the start date and end date.
- If the employee is taking time off in hours, select the start date, start time, and end time, down to the minutes.
- If an employee’s work schedule spans two calendar days (e.g., 9:00PM– 5:00AM), they can request time off in one go.
- For example, requesting time off from Jan 20, 9:00PM– Jan 21, 5:00AM will deduct 8 hours.
- If required, add a reason or note for the employee’s time off, and attach an image as a supporting document.
- Supported formats: JPG, JPEG, PNG, TIFF, HEIC
- File size: Up to 10MB per attachment
- Attachment: Maximum of 3 attachments per request
Note: Time off taken by Hours can only be added for up to 24 hours.
- Click Save.
- The time off added for your team member will now be added to the time off overview.
Note: All time off requests will be in pending state by default until an action is taken. Leave balances will be deducted for pending time off requests.
▶️ Explore the process below.
Reviewing time off
All time off requests will be displayed in the time off overview.
The actions that can be taken on time off requests are as follows:
- Edit pending time off requests
- Approve pending time off requests
- Reject pending time off requests
- Cancel approved time off requests
Editing time off requests
Important❗: Only time off requests that are in pending state can be edited.
- Go to Time Off.
- Use the search field to search for a team member or filter time off by date, policies, groups, positions, and statuses to narrow your results.

- Click on the pencil icon for the time off you wish to edit.
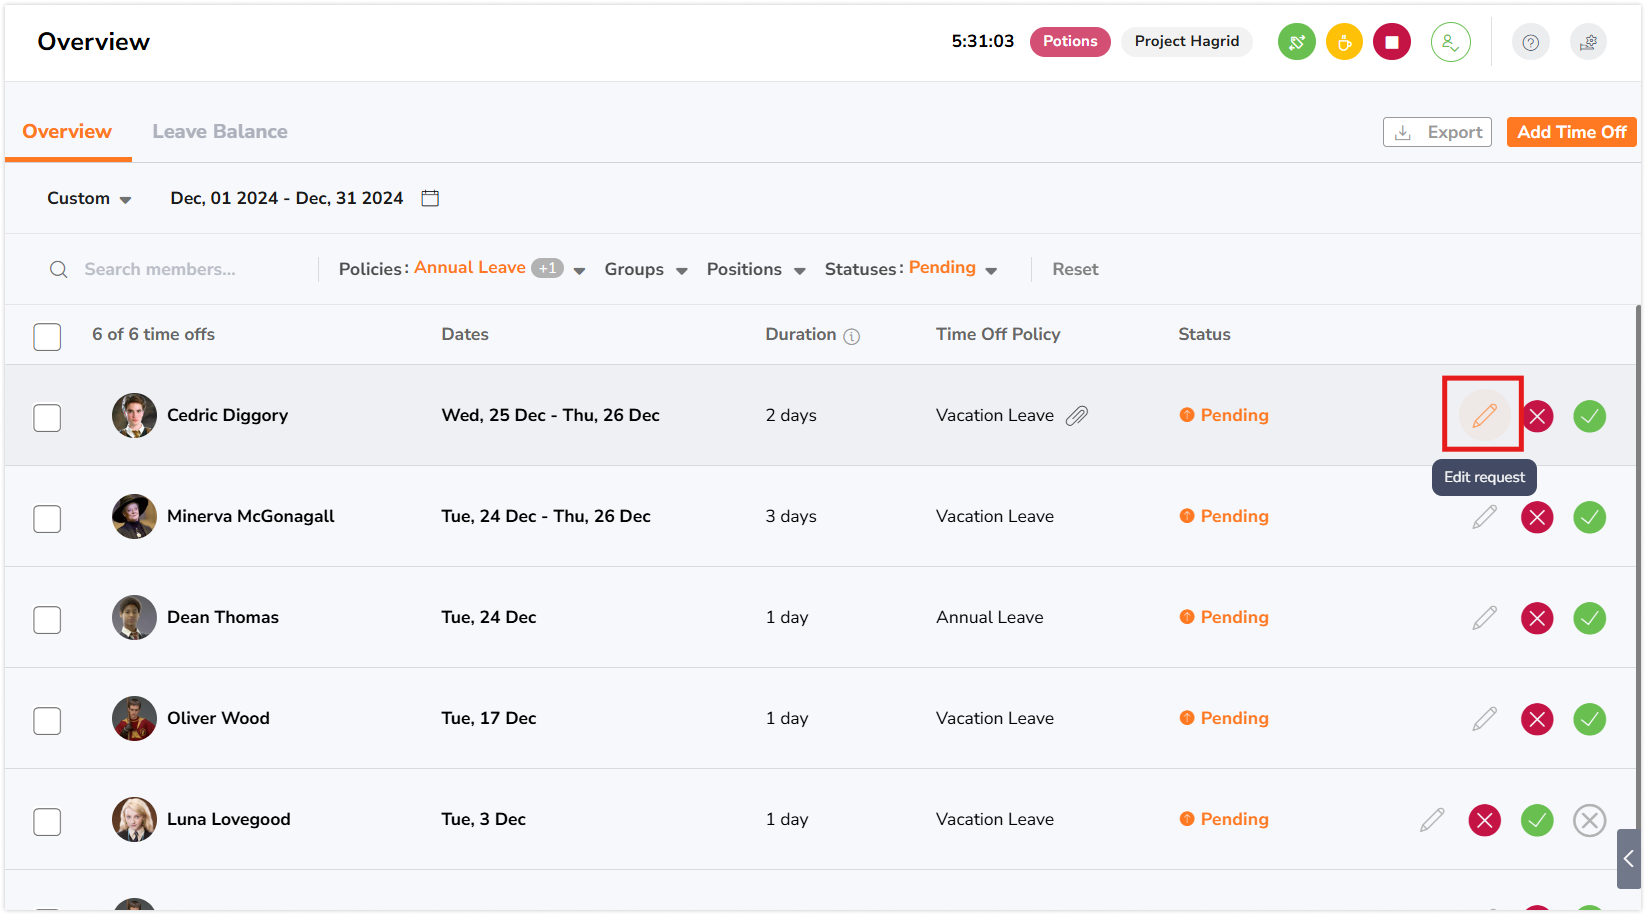
- Fill in the required information for your member’s time off.
- Click Save.
Note: Team members of all roles will be able to edit their own pending time off request.
When multi-level approvals are enabled:
- Requesters can edit their own time off request only before the first level approver takes action.
- Approvers can edit requests only if no approval action has been taken yet.
- Once an approver has taken action, the request becomes locked for editing by all other approvers.
For more information, check out how multi level approvals work.
Approving time off requests
Important❗: Only time off requests that are in pending state can be approved.
- Go to Time Off.
- Use the search field to search for a team member or filter time off by date, policies, groups, positions, and statuses to narrow your results.
- Click on the green approve button for the time off you wish to approve.
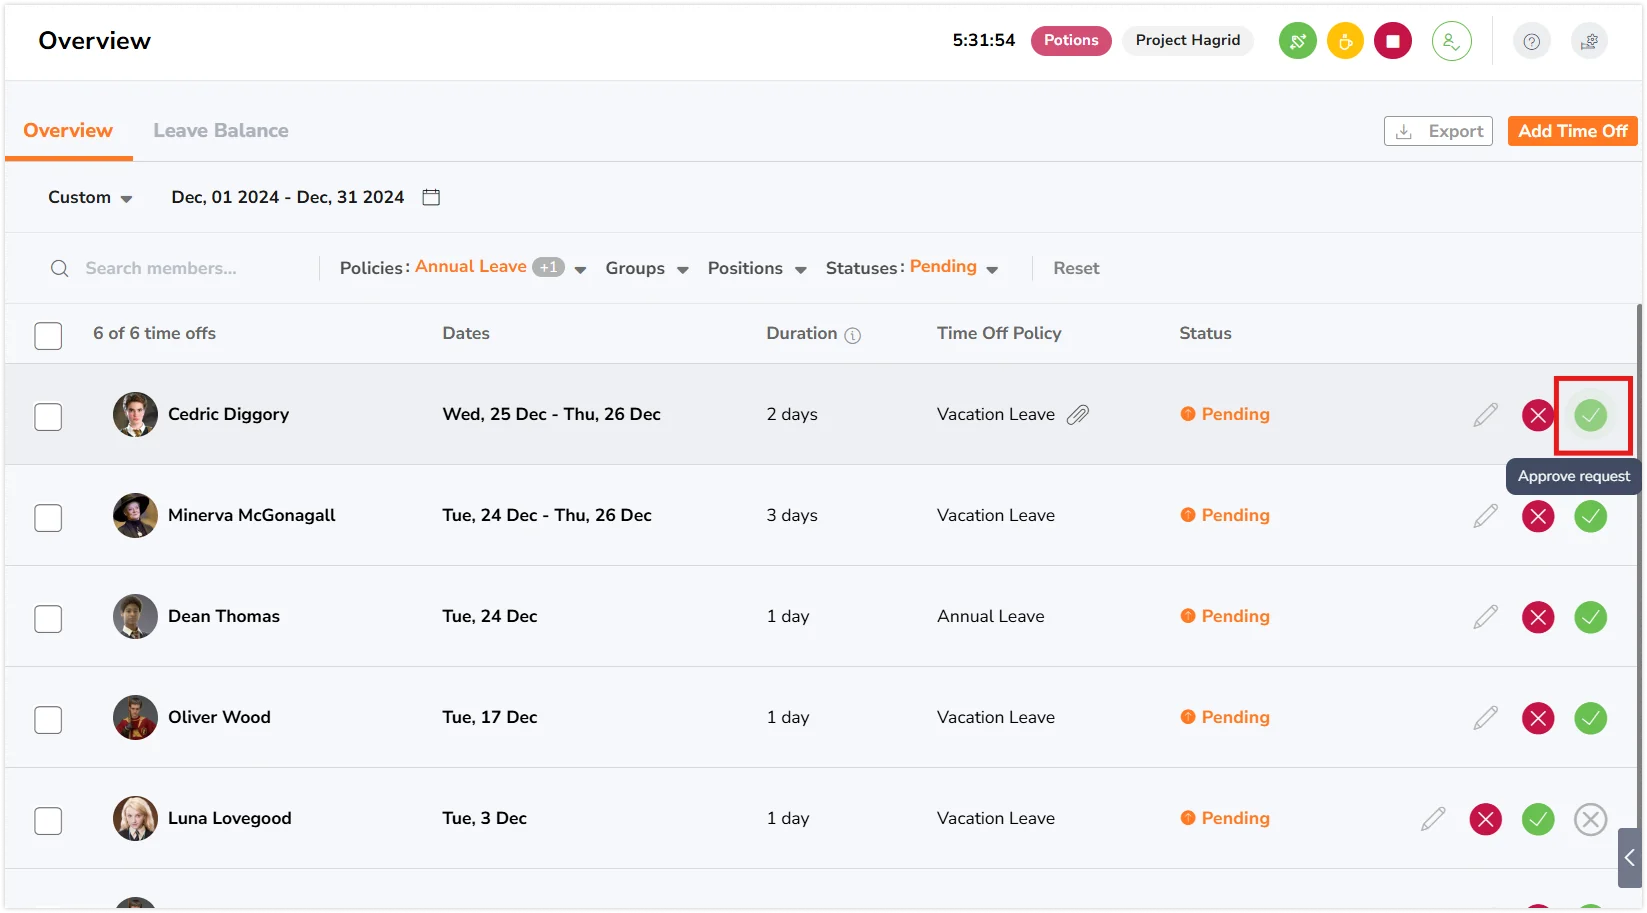
- Confirm your action in the prompt.
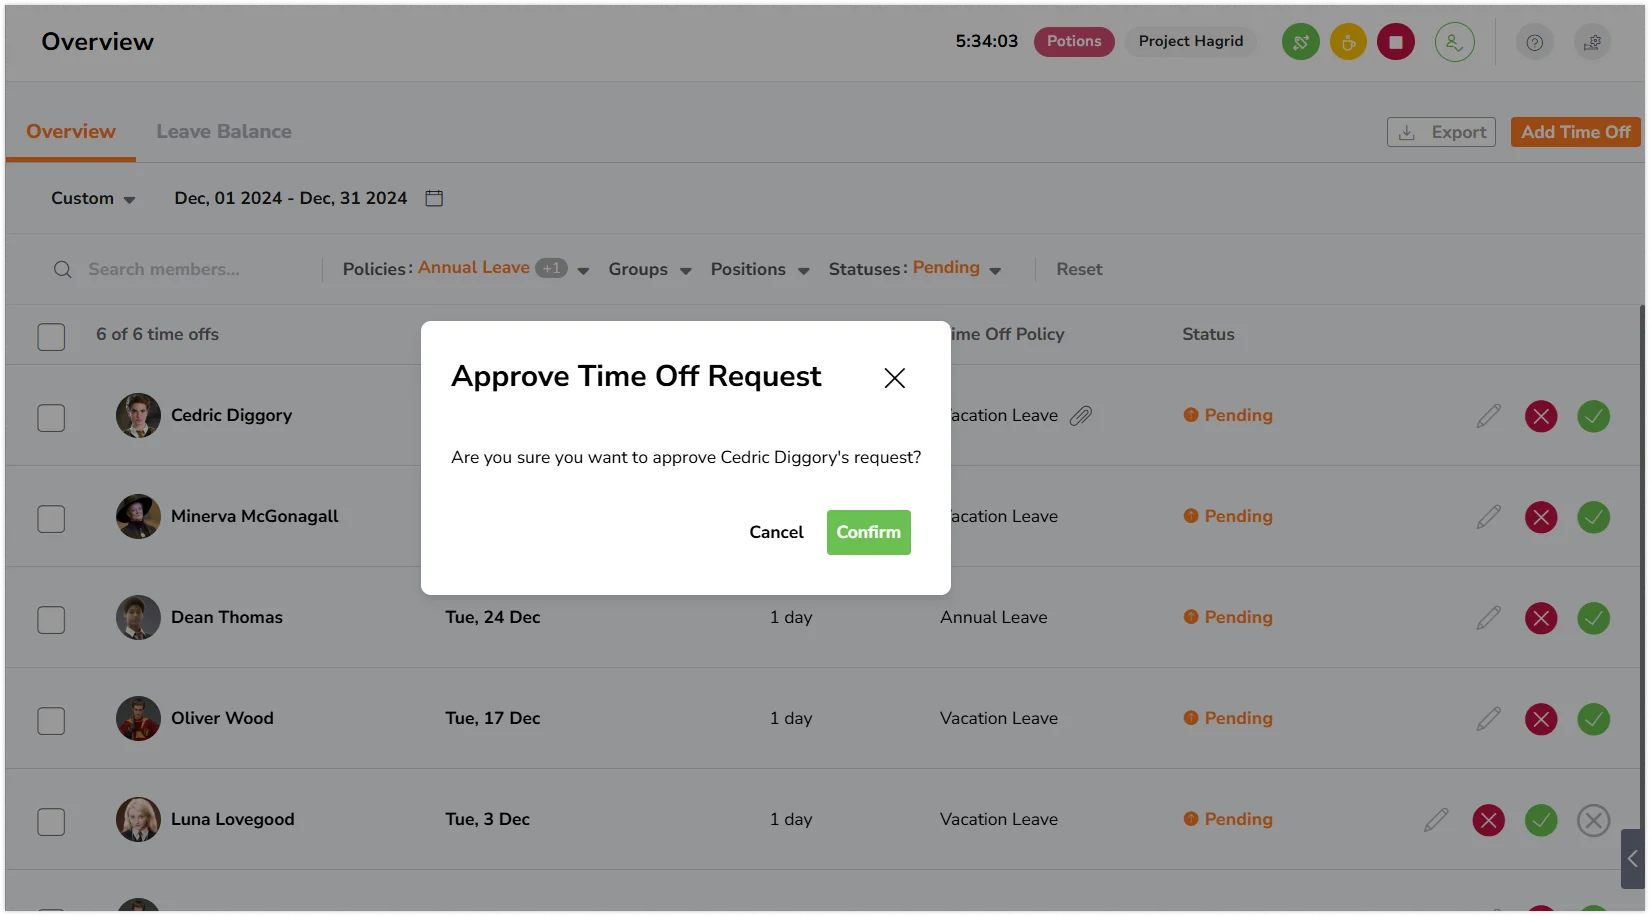
- The time off request will now have the approved status.

When multi-level approvals are enabled:
- Approvals can only be made in sequence of approval hierarchy.
- Approvers can only take action when the request reaches their designated level.
- Once an approver at a level approves the request, it moves to the next level.
- The request status will be shown as Pending (x/y), where “x” indicates the number of completed approvals, and “y” indicates the total levels.
- Once all levels have approved the request, it will be marked as Approved.
Note: Only one approver per level needs to take action, even if multiple approvers are assigned.
Rejecting time off requests
Important❗: Only time off requests that are in pending state can be rejected.
- Go to Time Off.
- Use the search field to search for a team member or filter time off by date, policies, groups, positions, and statuses to narrow your results.
- Click on the red reject button for the time off you wish to reject.
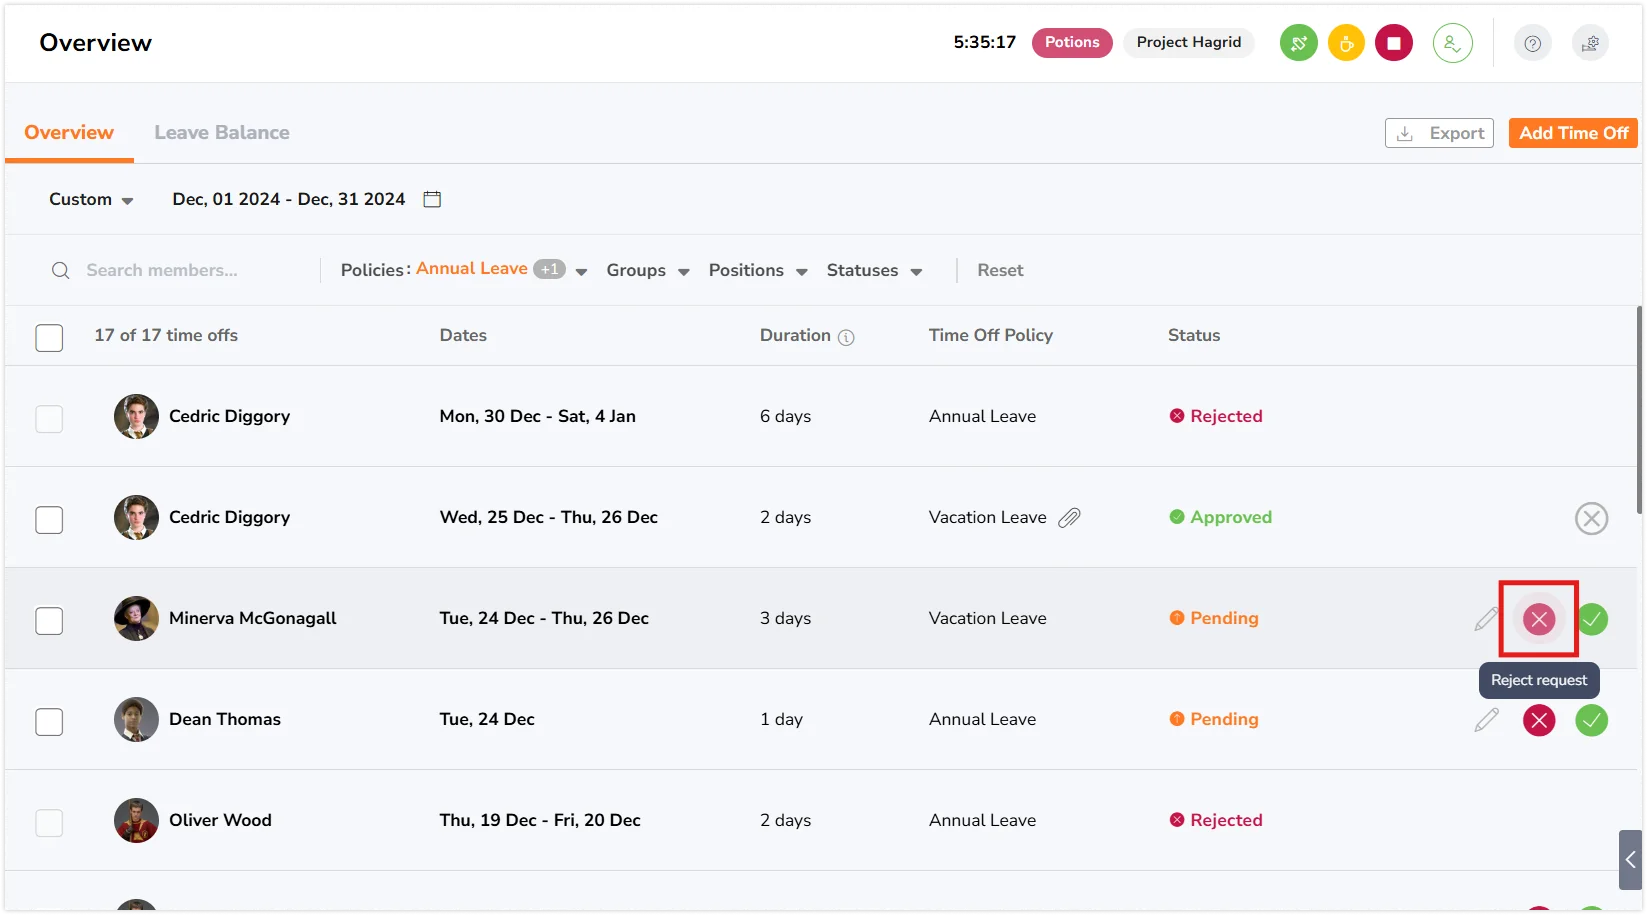
- Confirm your action in the prompt.
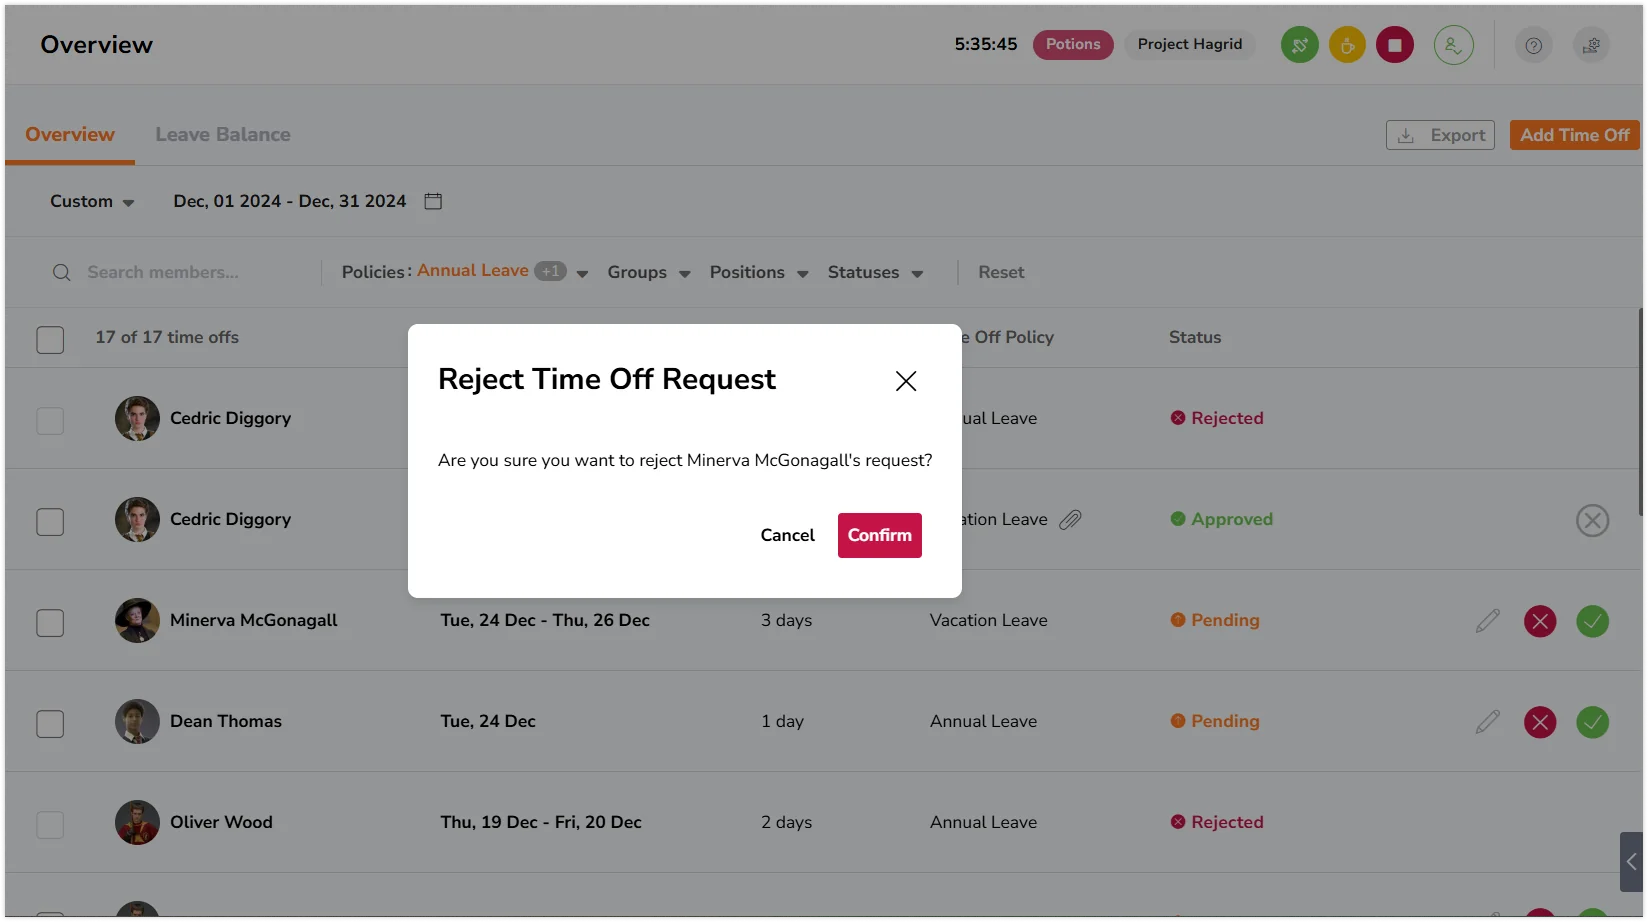
- The time off request will now have the rejected status.
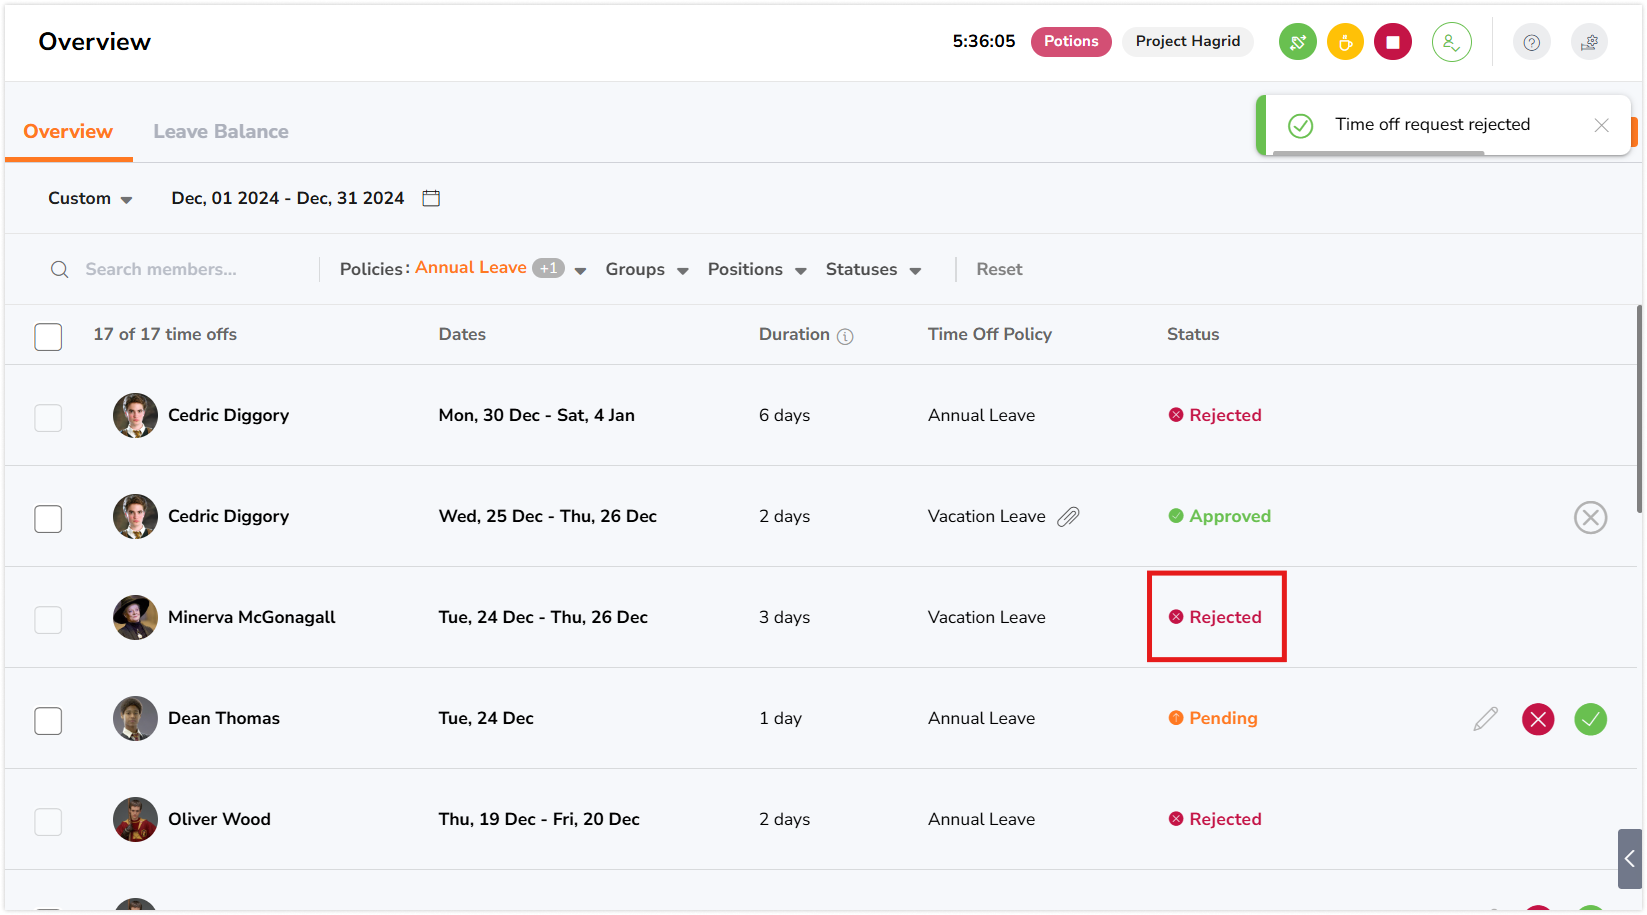
Note: If an entitlement amount has been set for the time off policy, leave balances will be reverted upon rejecting a time off request.
When multi-level approvals are enabled:
- Rejections can be made at any approval level.
- If a request is rejected, it is immediately marked as Rejected and no further actions can be taken.
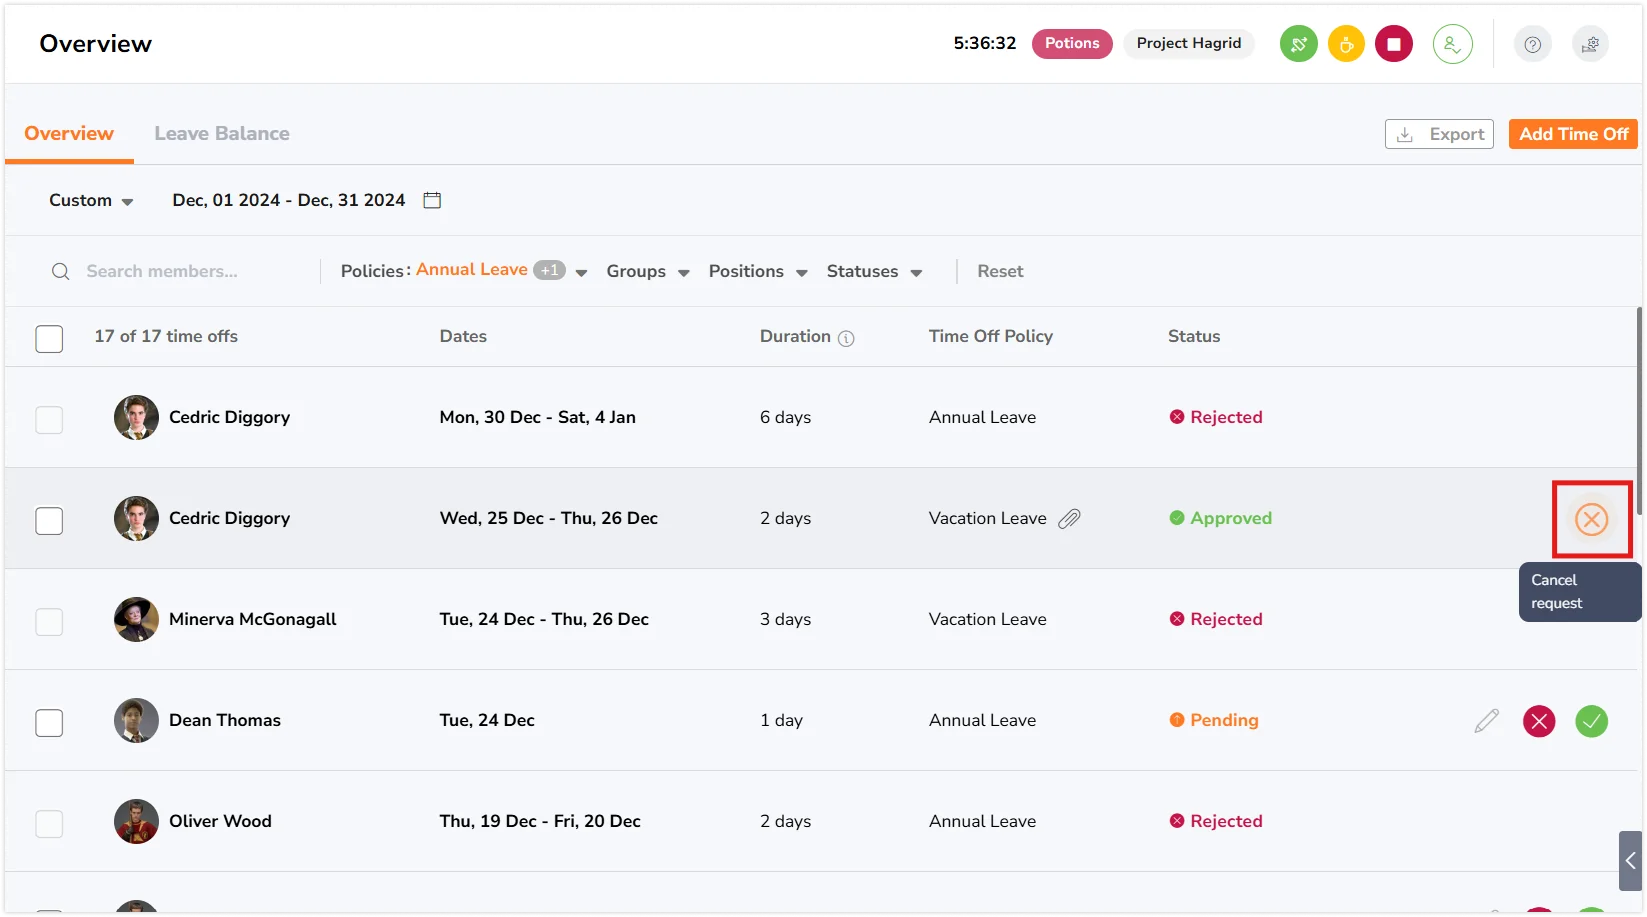
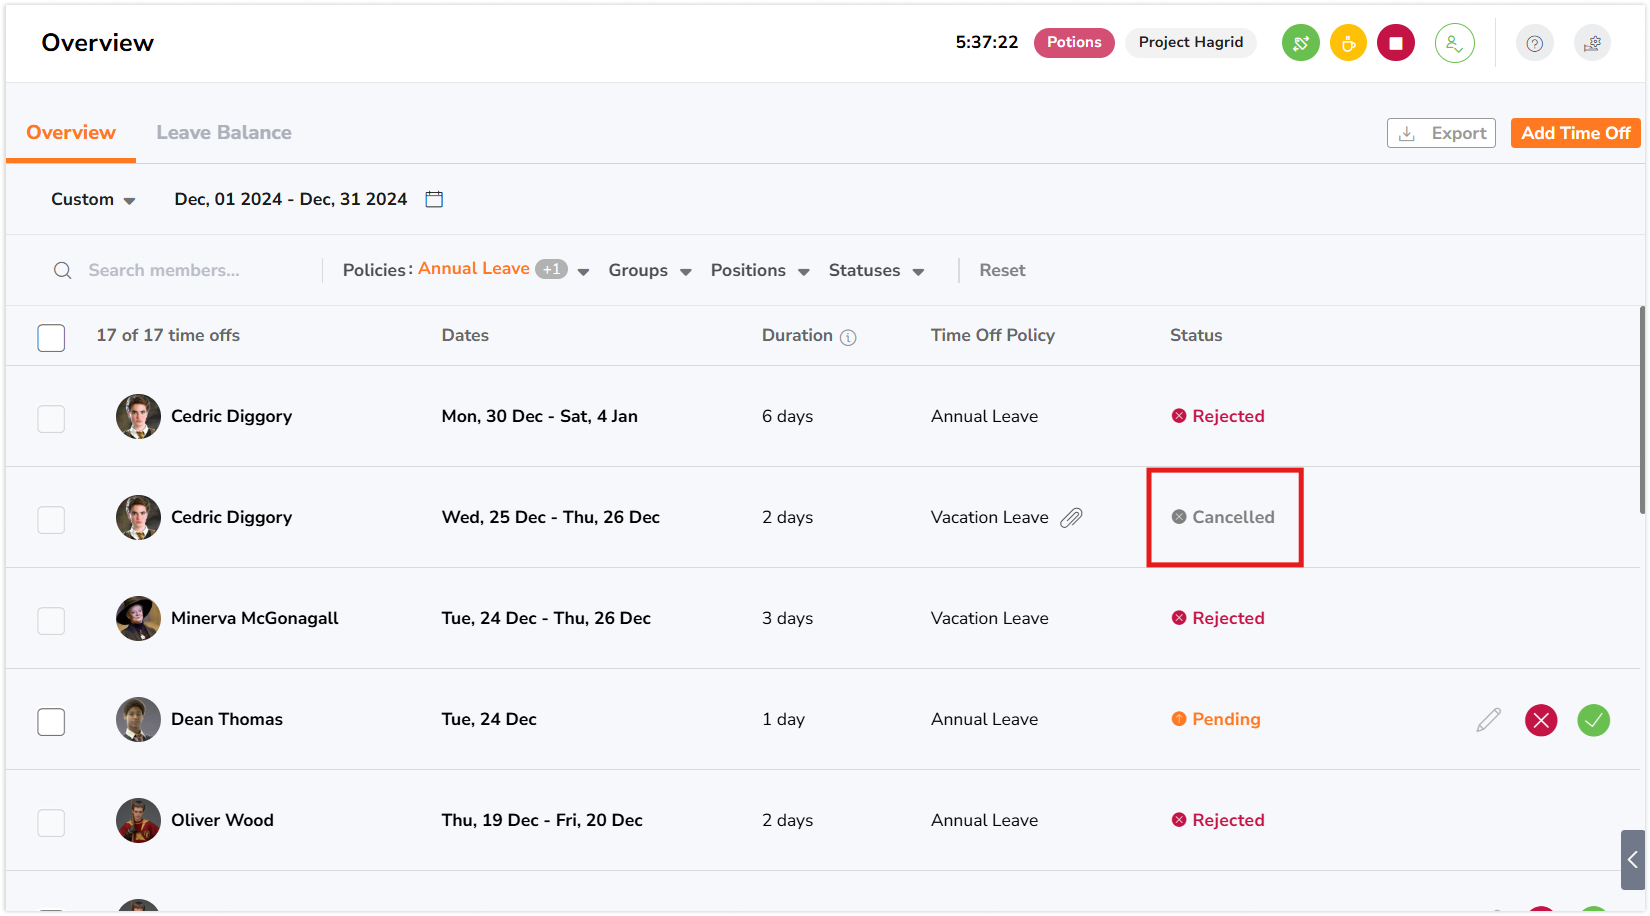
Cancelling approved time off requests
Important❗: Only time off requests that are in approved state can be cancelled by Approvers. Approvers will be able to cancel approved time off requests of their team members while members will only be able to cancel their own pending time off requests.
- Go to Time Off.
- Use the search field to search for a team member or filter time off by date, policies, groups, positions, and statuses to narrow your results.
- Click on the X icon for the approved time off you wish to cancel.
- Confirm your action in the prompt.
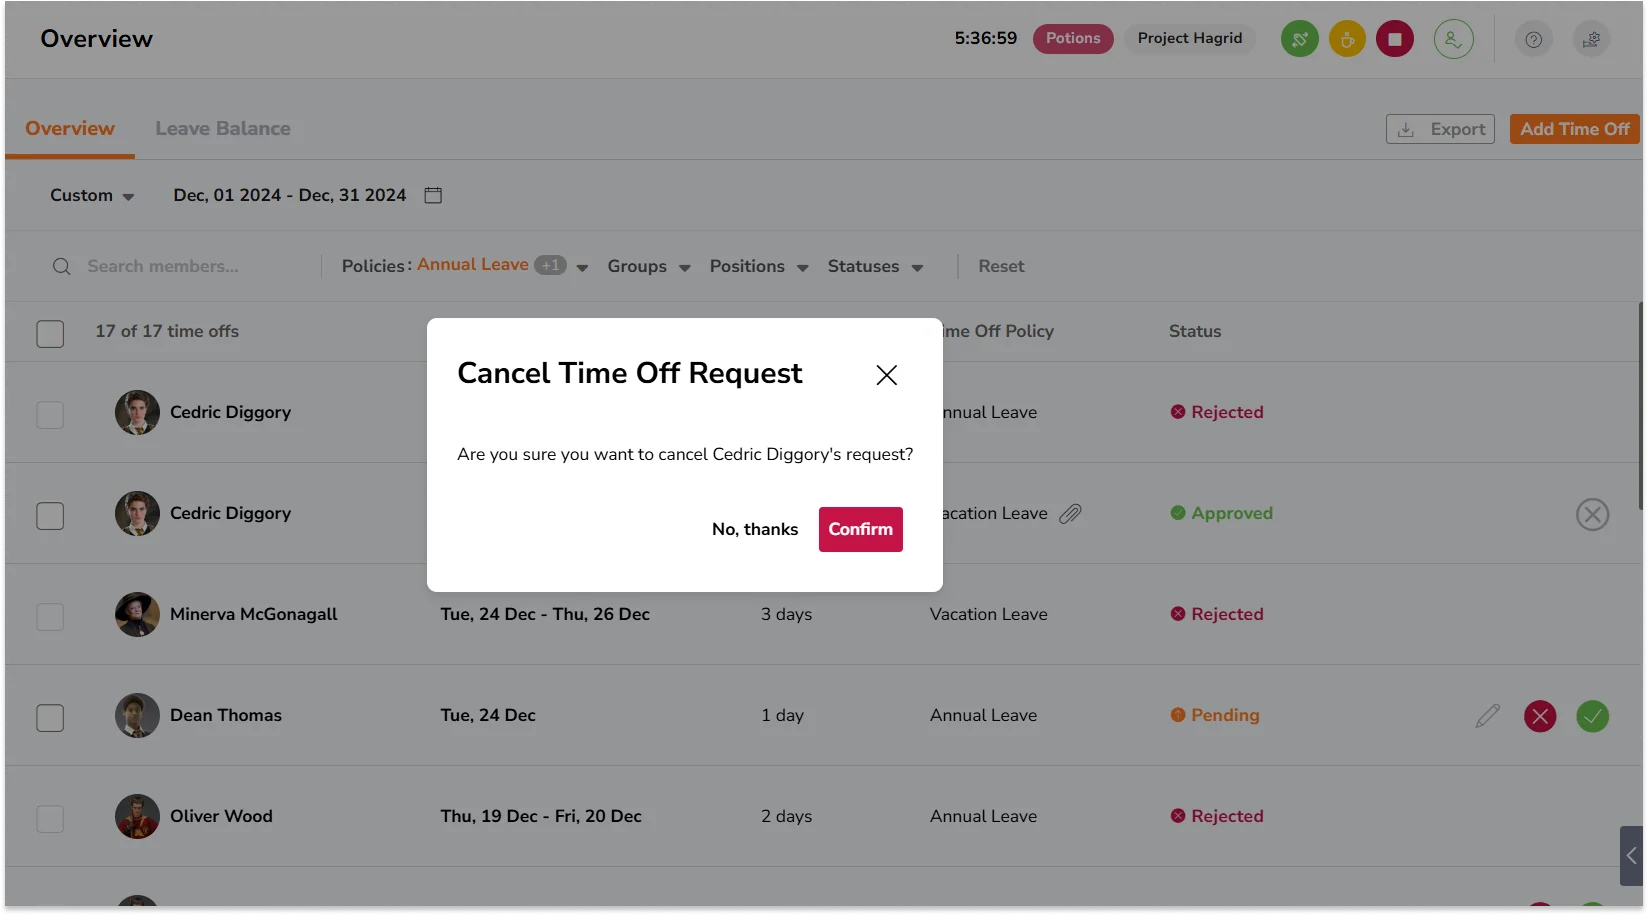
- The time off request will now have the cancelled status.
Note: If an entitlement amount has been set for the time off policy, leave balances will be reverted upon cancelling a time off request.
When multi-level approvals are enabled:
- Requesters can cancel their request only before the first level approver takes action.
- Approvers can cancel requests once it’s been approved.
Bulk operations for time off requests
For quick and easy approvals, you can manage time off requests in bulk. Note that bulk operations are only applicable to time off requests with identical actions.
Tip 💡: Filter time off requests by status and bulk select requests for simultaneous actions.
- Go to Time Off.
- Select the checkboxes next to the requests.
Note: Bulk operations can only be performed for time off requests with identical actions. If you select requests with different actions, you will not be able to perform bulk operations.
- Depending on the status of the requests, you will see different action buttons on the top right corner.
- Pending -> Approve or Reject
- Approved -> Cancel
- Rejected and Cancelled requests cannot be selected as no further actions can be performed.
- Click on the appropriate action and tap on Confirm.
▶️ Explore the process below.