Mobile App: Setting up activities
Team members can track time with activities for in depth analysis and reporting
On Jibble’s mobile app, members can track time against activities, allowing you to create reports that are useful for clients, payroll, job costing and productivity at work. Activity tracking can be useful to know where your team is tracking their hours, providing further insight into their tracked time.
If you’d like to learn about adding and viewing activities on web, read our article on setting up activities on the web app.
This article includes:
- Adding activities
- Archiving activities
- Assigning activities to groups of people
- Tracking time against activities
- Viewing activities in timesheets
Adding activities
You can create activities and view them directly from Jibble’s mobile app.
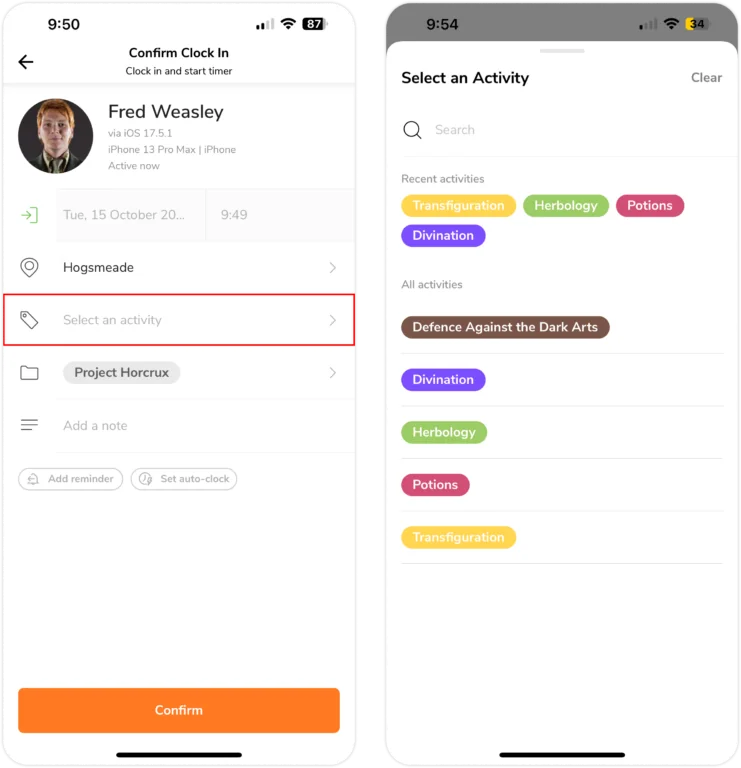
- Go to Menu > Activities.
- Tap the + sign located on the top right corner of the page.
- Input the Activity Name, Activity Code, and a Description.
- Select a colour indicator for the activity.
- Once completed, tap Save.
- Your newly created activity will be added to your existing list of activities.
Note: Created activities will be available to all members by default.
Archiving activities
To remove activities from your list, you can archive them or permanently delete them if needed.
- Go to Menu > Activities.
- Click on the activity you would like to remove.
- Tap on the Archive icon on the top right corner.
- Alternatively, you can swipe left on an activity from the list and click on the Archive button.
- Click Confirm to proceed with the action.
- The activity will now be archived and removed from the existing list of activities.
Note: Activities that are archived can be viewed in the Archived Activities list on the web app. Learn more about viewing archived activities, restoring or permanently deleting them on web.
▶️ Check out this interactive demo!
Assigning activities to groups of people
Jibble provides the flexibility to manage which activities are accessible for your team. While everyone can track all activities by default, you can restrict specific groups to relevant activities.
Doing so will ensure that members in the selected groups can only track time on designated activities. Any activities not included in the selection will be hidden from them when clocking in and tracking their time.
Assigning activities to groups is only available on the Essential, Growth, and Pro plan.
Note: Assigning activities to groups can be done via Jibble’s web app. To do so, refer to our guide on how to assign activities to groups.
Tracking time against activities
Once activities have been set up, your team members will have the option to choose the relevant activity when they clock in for work. Instead of clocking out to switch to a different activity, you can simply clock in again and select the new activity.
An average work day could look like this:
- 8:45 AM: Clock In – Product Testing (Start your day with product testing)
- 10:07 AM: Clock In – User Testing (Transition to user testing after completing initial tasks)
- 12:29 PM: Start Break (Lunch break!)
- 1:17 PM: Clock In – User Testing (Resume user testing after break)
- 3:30 PM: Start Break (Coffee break!)
- 4:00 PM: Clock In – Web Development (Shift to web development tasks)
- 6:13 PM: Clock Out (End of work day)
Viewing activities in timesheets
Your team members’ daily, weekly, and monthly time spent will contain more detailed information as they begin to log their time against activities.
On Jibble’s mobile app, this data is available for viewing through Timesheets:
Go to Timesheets > Tap on a specific date > Tap on a member’s Daily Timesheet. Timesheets on the mobile app will look like this:
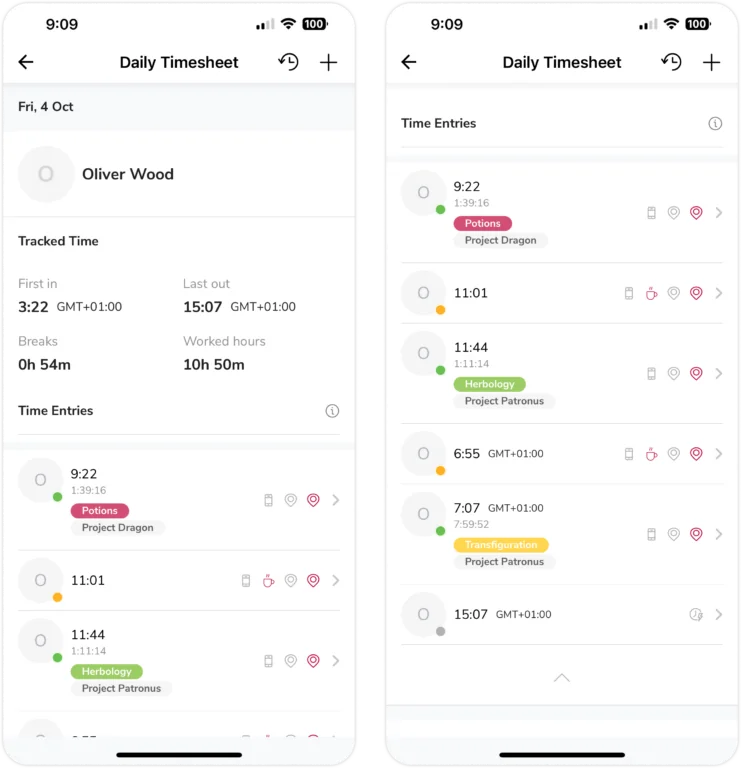
The activities tracked will appear within their time entries. For more information on timesheet details and a further breakdown of its contents, refer to our guide on how timesheets work.