How do I enable screen capturing?
Activate screen capturing for enhanced productivity while respecting employees' privacy
Screen capturing is a feature in Jibble’s desktop time tracker, allowing businesses to enhance productivity, keep a close eye on activities and track work hours effectively.
This feature is available on all plans (Free, Premium, and Ultimate). If you haven’t already, check out our article on how screen capturing works to learn more.
This article covers:
Enabling screen capturing on the web app
Screen capture settings can be configured by Owners and Admins, either for the entire organization (all members) or specific groups.
To enable screenshot capture for the whole organization:
- Go to Time Tracking.
- Look for the Device Restrictions section, click on the pencil icon to make changes.
- Enable Desktop Apps, and click Save.
Tip 💡: For better control over screen recording, we recommend disabling other devices within Device Restrictions. Screen recording control is exclusively managed through the Desktop app, and using alternative platforms may result in unexpected screenshots being uploaded.
- Look for the Screenshots section and click on the pencil icon to make changes.
- Select the checkbox for Require screenshot capturing.
Note: Enabling screenshot capturing settings enforces all members to activate screenshots on their desktop app for clocking in. Failure to do so will prevent clocking in for these members.
- Choose how often screenshots are taken:
- Free Plan: Screenshots are taken randomly once in every 10 minutes interval.
- Premium Plan: Screenshots are taken once every 5 or 10 minutes interval.
- Ultimate Plan: Screenshots are taken once every 2, 5, or 10 minutes interval.
- If you’re on the Ultimate plan, you will be able to select the number of months (1-12) to store screenshots.
Note: On the Free plan, screenshots are stored for 3 days whereas on the Premium plan, screenshots are stored for 1 month. Read our article on how screen capturing works to learn more about screenshot storage.
- Select between blurred or high quality resolution for your captured screenshots.
- Tap on Save.
▶️ Go ahead and try it out.
To enable screenshot capture for particular groups:
If you require screenshot capturing only for specific members within your organization, you can assign them to a group and activate advanced group settings, instead of applying the default settings for the entire organization.
Do note that group time tracking settings override the organization’s default settings and are mandatory for all group members when clocking in and out.
- Go to People and select Groups.
- Click on a group you wish to enable screenshot capturing for.
- Tap on the cog icon to access group settings.
- Enable desktop apps under the Device Restrictions section.
- Look for the Screenshots section and select the checkbox for Require screenshot capturing.
Note: Screenshot storage duration, resolution, and interval settings are managed at the organization level and cannot be customized for individual groups.
- Click Save.
- Repeat steps 2 to 6 for other groups as needed.
Important ❗: For any changes or updates made to Time Tracking Settings on the web, please ensure to restart your desktop application to apply the updates effectively.
▶️ Try the steps yourself below.
Allowing screen capturing on the desktop app
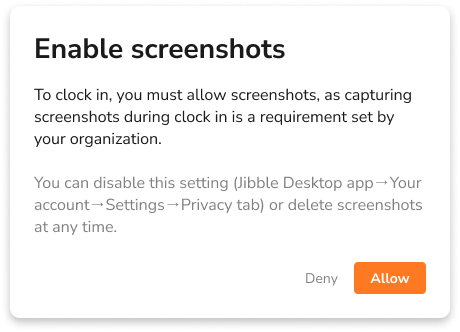
Once screenshot capture is enabled under Time Tracking Settings, members tracking time via Jibble’s desktop app will be prompted to allow screen capture on their devices. Each team member will be required to allow this access.
- Launch Jibble’s desktop app.
- Log in to your account.
- Tap on the green play button.
- A message will prompt you to allow screen capture on your device.
- Click on Allow.
Note: If screenshot capture is enforced under Time Tracking Settings, you will be blocked from tracking time on the desktop app until you allow screen capture. - Depending on your device, you may see another message to allow screen recording in your device settings.
- Follow the on-screen instructions and click Continue when finished.
To learn more about how to view captured screenshots, check out our article on viewing and deleting screenshots.
